This is the first entry I write in English and this entry should have been posted about more than a month ago but then there were so many things happened and I was so busy that I haven’t had enough time to complete. After all, I learn a very important lesson: “Life is unexpected and out of control”… So let’s just enjoy your day, do what you wanna do and be yourself. Even if you fail, when you look back, you can be proud of yourself and you won’t feel guilty that you didn’t give it a try.
Many people asked me why I didn’t write my blog in English so that many people, not only Vietnamese, but also foreigners can read and enjoy the recipes of all the delicious food. That’s a good question and it inspired me to write this entry in English.
Cooking is my hobby and more than that, I can cook for my lover, my family, my friends … I really love to do this, but sometimes it’s not easy to make it, especially when we still don’t have our own kitchen. You know, I always say to my friends that if I can build my own house, the most beautiful place should be the KITCHEN! Now I’m still on the way to my dream … But don’t worry, I can still cook for you, if you want ;) … As Mats asked me, “Candy, so when will you cook for me and Sandrina? You are about to leave us in just one month …” I said:” Of course, I will. Why don’t you guys come to my place this weekend” … That’s it! Then the deal was done like that.
My space is a small room and I live with a landlady, who never cooks (or she used to cook : ) )so I can use the kitchen as I want. However, it is too small to invite so many guests, two should be enough … I was thinking about which dish should I cook to introduce to my foreign friends about Vietnamese food. Mats went to Sai Gon a few weeks ago and he said that he didn’t really like Vietnamese food. He was there just for 3 days but I guess: to know very well about any cuisine, you should spend a lot of time there to explore and try different kind of food from street food to a restaurant. It took me for 4 years to realize how much I love Thai cuisine. But then now, again this could be the last chance for me to introduce to Mats about Vietnamese cuisine… Sandrina has never tried Vietnamese food before. So … which dish should be? I thought a lot and then I decided to make to two dishes on that day. One was “Fresh Spring Rolls” (or Summer rolls) and the other was “Bun Thang” – Hanoi Chicken Vermicelli. I thought these two dishes can show very clear that Vietnamese food is healthy, fresh and very delicate. The taste of those dishes is impressive and it could be different from what Mats had in Sai Gon. To make these two dishes, the cook have to spend more time to prepare and the eaters should also learn something. Especially with “Fresh Spring Roll”, I call it “DIY dish” … However, I will post the recipe of “Fresh Spring Rolls” (or Summer rolls) in another entry. This entry I will focus only on “Bun Thang”
Bun Thang is a kind of noodles which stands for Hanoi cuisine. Many people said, having this dish could help them know more about Hanoian. Hanoi cuisine is not simple, it is really finical and delicate. So look at “Bun thang”, there are more than 3 main ingredients and everything should be cut thinly and well-prepared. But trust me, they are not that hard to make. So keep calm and let’s get started! Take your time and you can feel the delicious food when you taste it ;)
1. Ingredients:
- Half of the whole chicken
- 1 thumb of ginger
- 200g dried shrimps
- 100g dried mushrooms (dried whole shiitake mushrooms)
- 300 grams of neck pork bones (Optional to make the broth better)
- 100g Vietnamese Ham ( Gio lua / Cha lua) (Note: I don’t have this in Singapore nor I can make it so I just use the normal ham. Though the taste is little bit different but it works though)
- 2 eggs
- About 1 cup of thinly sliced white radish (daikon)
- 2-3 Green onions,
- A handful bunch of laksa leaves (rau răm) or cilantro
- Fish sauce (to taste)
- Vietnamese shrimp paste.
- Rice vinegar (or white vinegar should work)
- Vietnamese rice vermicelli, size S (Bun) (fresh or dried one should be ok but it should be thin)
2. Instructions:
2.1. Broth:
- Clean the chicken, put it in a big pot then cover with cold water. Put some slide of ginger in. Turn on the heat to high until it becomes boiling then turn off the heat. Cover the lid then let the chicken sit there for 15 minutes. Check if the chicken is done using a chopstick or something to poke in the tight. If the water comes out clear, then the chicken is done. If the water is still a little bit pink, turn on the heat again to make the pot to boil. Turn off the heat and cover the lid. Let the chicken sit for another 15 minutes. Check again and after 2 times doing like that, the chicken should be done. If you do this way, your chicken will be nice firmly, not mushy and you keep all the juice of the chicken in. Take the chicken out to cool down.
- Put the dried shrimps and dried mushroom into a bowl separately then cover with cold water. Let them sit for at least 30 minutes. Rinse well with cold water then add them to the chicken broth. Turn on the heat of the broth to boil. Turn the heat down to low and let it simmer while you work on with your chicken.
- After the chicken is cooled down, separate the meat and the bones. Put those bones (you can add pork neck bones after boil them, rinse well at this point) to the pot and continue to simmer for 15-20 mins. Add 2-3 Tablespoons of fish sauce and salt to taste.
2.2. Shrimp Floss: I can say that it makes this dish outstanding because of the shrimp floss. I’m sure that you will like it. So you can make a batch of the floss then use it for next time because the floss is dry and can be kept for a quite long time.
- Soak the rest of the dried shrimps into water for 15 mins. Wash them carefully because they may have sand inside.
- Use your blender or food processor to make them become small and flossy (as picture) then put them in a pan: use low heat and stir it constantly till it becomes really dry. I don’t have the blender so I use a traditional way to make it by mortar and pestle ;). It’s still ok but takes more time hehe.
2.3. Eggs: As I said above, everything in this dish is so tiny and so is the egg. To make it, you need some practice and patience , but I’ll show how to make so thin.
- Beat 2 eggs and blend it well with some fish sauce
- Use a small pan, put some cooking oil in. Heat it up then make sure that the cooking oil is coated on the surface of the pan. After that, pour the cooking oil into a small bowl. You know why? To make the egg thin, you should use a very small amount of oil … So now pour some egg into the pan. Make sure that you swirl the pan well enough to coat the pan with the egg evenly, and cook until set. Done!! It should be very thin. Cool the egg down and chop into thin strips.
2.4. Pickled Radish: I’m not sure that my way is a traditional way or not but I think it is good enough, especially when we are away from Vietnam. Good thing is: this way is really fast and tasteful ;)
- Chop the white radish into small and thin pieces. Put a tsp of salt and set aside for 15 – 20 mins
- Wash them twice to make sure there is no more salt and the bitter of the radish will go away. Actually, when you do like this, it’s a fast way to make the pickled thing.
- Put the vinegar, sugar with the ratio: 1 vinegar : 3 sugar and mix the radish well. If you like, you can put some fresh chilis to make it a little bit spicy.
- Taste it, it should be sour, sweet, salty and spicy. Set aside for 1 hour before serving.
2.5. Others: Come on, be patient!!! You almost there to heaven ;)
- Use your hand to shred the chicken to small and thin strips. The thinner, the better.
- Chop the ham to thin strips.
- Chop the green onion and laksa leaves small. I have to say laksa leaves are very important for this dish. Without it, 50% of the dish is not the original Vietnamese dish. Believe me, try to have 2 bowls, one is with laksa leaves, the other is without, you can see the difference easily. I’m happy that I can find it very easy in Singapore. But just in case you cannot get it, use cilantro to substitute.
- If you use dried vermicelli, then remember to boil it and rinse it into cold water as directed in the label of the packet.
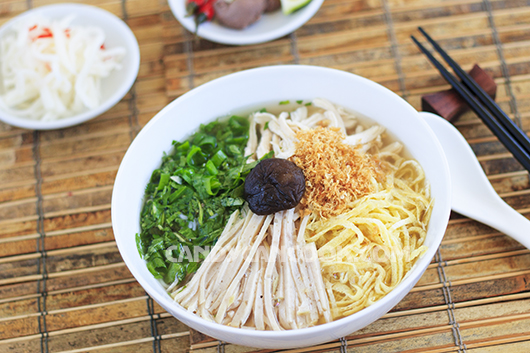
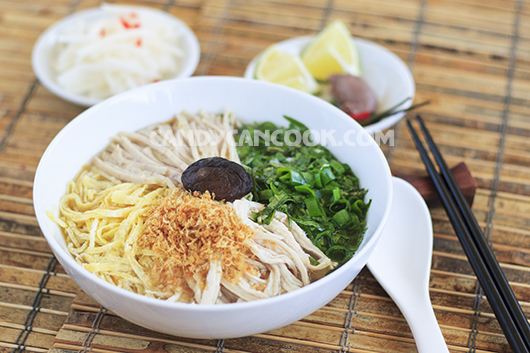
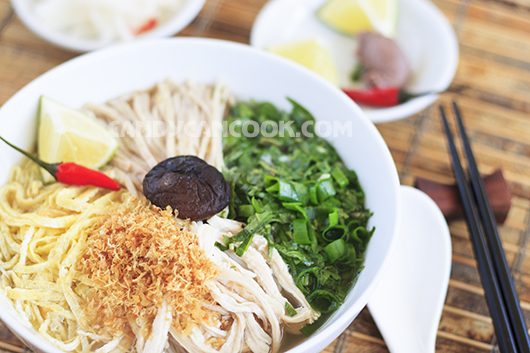
Now, are you ready? Yes, I am ready to serve ;) Put everything into a big bowl. Add the vermicelli, chicken, eggs, shrimps floss, ham, green onion and laksa leaves … See, there’s a lot of ingredients so each of those should be just a little bit, ok ;) I’d like to do some arrangement with all those ingredients to make the dish nice and colorful. Now you also eat with eyes ;) Finally, gently pour the broth to your bowl. Please remember to turn on the heat to make the broth really hot before pour those good things together. And now there you have it – Bun Thang – a signature dish of Hanoian.
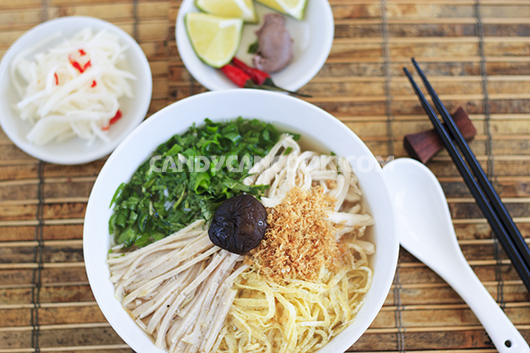
Put all the ingredients into a bowl then carefully pour in the good broth to have a wonderful Bun Thang
I’m sure that you will be happy and enjoy when you make it and have it by yourself hehe … because after many little things you’ve done, this is the very special gift you can give to anyone … So does the meaning of the dish – Bun Thang.
We had a really good time and I hope that Mats and Sandrina could feel something about Vietnamese Cuisine as well as Hanoian :X …
Good luck and be happy!!! Have a nice weekend ^^
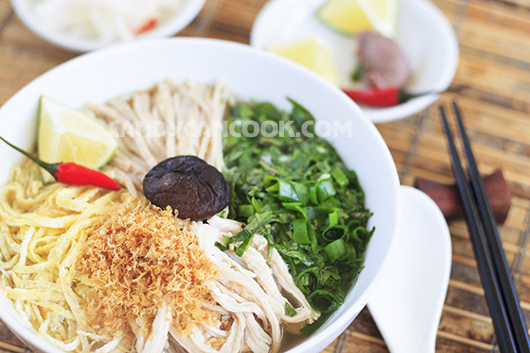
Ingredients
- Half of the whole chicken
- 1 thumb of ginger
- 200g dried shrimps
- 100g dried mushrooms (dried whole shiitake mushrooms)
- 300 grams of neck pork bones (Optional to make the broth better)
- 100g Vietnamese Ham ( Gio lua / Cha lua) (Note: I don’t have this in Singapore nor I can make it so I just use the normal ham. Though the taste is little bit different but it works though)
- 2 eggs
- About 1 cup of thinly sliced white radish (daikon)
- 2-3 Green onions,
- A handful bunch of laksa leaves (rau răm) or cilantro
- Fish sauce (to taste)
- Vietnamese shrimp paste.
- Rice vinegar (or white vinegar should work)
- Vietnamese rice vermicelli, size S (Bun) (fresh or dried one should be ok but it should be thin)
Instructions
- Broth:
- Clean the chicken, put it in a big pot then cover with cold water. Put some slide of ginger in. Turn on the heat to high until it becomes boiling then turn off the heat. Cover the lid then let the chicken sit there for 15 minutes. Check if the chicken is done using a chopstick or something to poke in the tight. If the water comes out clear, then the chicken is done. If the water is still a little bit pink, turn on the heat again to make the pot to boil. Turn off the heat and cover the lid. Let the chicken sit for another 15 minutes. Check again and after 2 times doing like that, the chicken should be done. If you do this way, your chicken will be nice firmly, not mushy and you keep all the juice of the chicken in. Take the chicken out to cool down.
- Put the dried shrimps and dried mushroom into a bowl separately then cover with cold water. Let them sit for at least 30 minutes. Rinse well with cold water then add them to the chicken broth. Turn on the heat of the broth to boil. Turn the heat down to low and let it simmer while you work on with your chicken.
- After the chicken is cooled down, separate the meat and the bones. Put those bones (you can add pork neck bones after boil them, rinse well at this point) to the pot and continue to simmer for 15-20 mins. Add 2-3 Tablespoons of fish sauce and salt to taste.
2. Shrimp Floss:
- Soak the rest of the dried shrimps into water for 15 mins. Wash them carefully because they may have sand inside.
- Use your blender or food processor to make them become small and flossy (as picture) then put them in a pan: use low heat and stir it constantly till it becomes really dry. I don’t have the blender so I use a traditional way to make it by mortar and pestle ;). It’s still ok but takes more time hehe.
3. Eggs:
- Beat 2 eggs and blend it well with some fish sauce
- Use a small pan, put some cooking oil in. Heat it up then make sure that the cooking oil is coated on the surface of the pan. After that, pour the cooking oil into a small bowl. You know why? To make the egg thin, you should use a very small amount of oil … So now pour some egg into the pan. Make sure that you swirl the pan well enough to coat the pan with the egg evenly, and cook until set. Done!! It should be very thin. Cool the egg down and chop into thin strips.
4. Pickled Radish:
- Chop the white radish into small and thin pieces. Put a tsp of salt and set aside for 15 – 20 mins
- Wash them twice to make sure there is no more salt and the bitter of the radish will go away. Actually, when you do like this, it’s a fast way to make the pickled thing.
- Put the vinegar, sugar with the ratio: 1 vinegar : 3 sugar and mix the radish well. If you like, you can put some fresh chilis to make it a little bit spicy.
- Taste it, it should be sour, sweet, salty and spicy. Set aside for 1 hour before serving.
5. Others:
- Use your hand to shred the chicken to small and thin strips. The thinner, the better.
- Chop the ham to thin strips.
- Chop the green onion and laksa leaves small. I have to say laksa leaves are very important for this dish. Without it, 50% of the dish is not the original Vietnamese dish. Believe me, try to have 2 bowls, one is with laksa leaves, the other is without, you can see the difference easily. I’m happy that I can find it very easy in Singapore. But just in case you cannot get it, use cilantro to substitute.
- If you use dried vermicelli, then remember to boil it and rinse it into cold water as directed in the label of the packet.
- Put everything into a big bowl. Add the vermicelli, chicken, eggs, shrimps floss, ham, green onion and laksa leaves . Gently pour the broth to your bowl. Please remember to turn on the heat to make the broth really hot before pour those good things together.




21 comments
Bún thang, one of my favorite dishes :p hehe đặc trưng nhất vị rau răm và cà cuống :x
hehe … Giờ mà đòi cà cuống thì sang quá chồng ơi :D Ăn tạm với mắm tôm thôi ;;)
version nay toan tieng Anh ah,.. hay hay :)) … ma` “Ca` cuo’ng” la cai chi vay????? T_T
http://vi.wikipedia.org/wiki/C%C3%A0_cu%E1%BB%91ng
Anh ơi, vào đây xem giải nghĩa cà cuống ;;)
E update blog vì giờ có nhìu bạn nc ngoài ;) … Thỉnh thoảng vít tí TA cho đỡ bùn hehe
Lovely entry xD especially Tom khi xay nhin ngon wa :X
Thank nàng nhá :X … Tôm khô làm thế này nhìn hấp dẫn mà rất thơm :D
Trời đất, có cái entry tỉ mỉ như vầy cách đây cả tháng mà h tao mới vào xem ^^. hic hic, đúng là cuộc đời của tao shut down trong đống hồ sơ rồi, chả bù trc đây, lượn lờ suốt:(.
Anw, tks mày vì đã give me an unexpected wake-up-call ;) :* :D
hehe … Chuyển chỗ làm mới ngốn hết thời gian của mày rùi cưng ạ :D … Cố gắng balance nhé … k đc 50-50 thì cũng phải 48-52 chứ ;;) :D
Hi vọng sau vài lần gặp nhau ít ỏi mày sẽ tự tìm ra đc lối đi nào đấy cho riêng mình ;;) :X Aja :*
Sure, I did ;). H xem tao làm j với cái lối đi đó thôi:)). Mày đã kịp settle down để vào candycancook rùi à? ^^ Nhg ngày đầu in US tn mày?
Chưa settle down :D Chắc phải vài tuần nữa mới ổn mày ạ … Mày nhớ update tình hình cho tao nhá ;;)
I can’t wait to try this, it looks delicious! Beautiful pictures!
Thank you! Once you taste it, you’ll never forget it!!! I really love it too :X
Mon bun thang nay.me c cung hay lam lam.moi lan di bien
Thế à chị. Món này thật ra ở nhà em, mẹ em chẳng nấu bao giờ hihi … Đi lấy chồng hóa ra là món tủ của mẹ chồng ;)) với cả ăn ngoài hàng … Xa HN rùi nhớ nên em làm đấy chị ạ ^^ … Mà sao đi biển nhà chị lại làm bún thang ạ :-s
Nguyên liệu này dành cho bao nhiêu người ạ?
Khoảng cho 4 người em ạ :)
Nhiều cửa hàng chẳng có đủ gia vị thế này đâu, ăn không thưởng thức được hết vị ngon của bún thang.
Thế à em :X Cám ơn em nhiều nhé.
Em lại chưa được ăn món này bao giờ, cuối tuần này phải vào bếp tự trổ tài đãi cả nhà mới được, nguyên liệu cũng đơn giản. Lại có món mới thưởng thức rồi.
[…] If you want to try cooking bun thang in your home, this might help you: https://en.candycancook.com2011/06/how-to-cook-bun-thang-hanoi-chicken-vermicelli/ […]
[…] dishes such as Bun cha/ Bun thit nuong (Vietnamese grilled pork and meatball with rice vermicelli); Bun thang (Hanoi Chicken Vermicelli) or even it could be a side dish to eat with rice in a normal meal. My husband love pickled stuffs, […]